#算法模型QAT量化+部署 快速上手
#基本流程
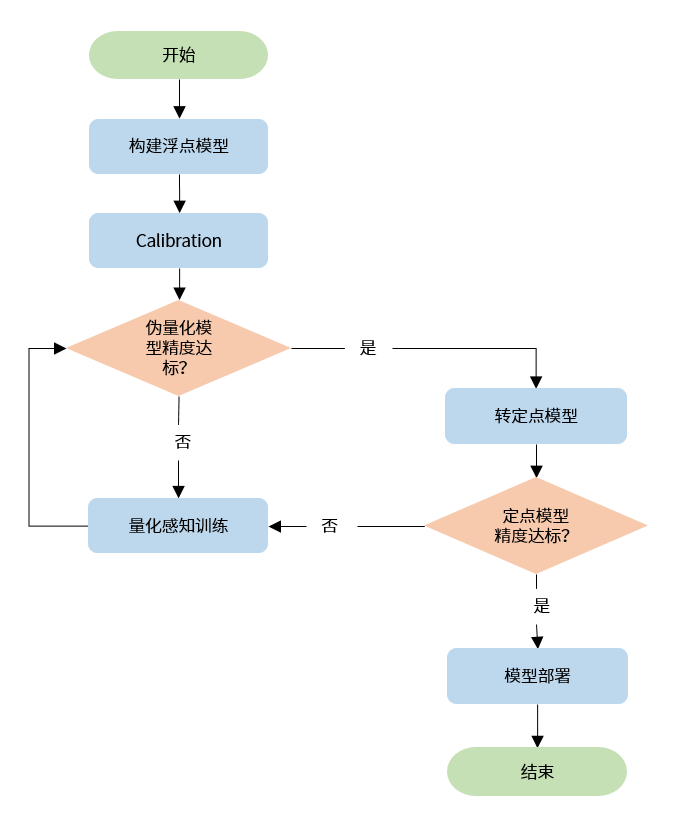
量化感知训练工具的基本使用流程如下:
下面以 torchvision 中的 MobileNetV2 模型为例,介绍流程中每个阶段的具体操作。
出于流程展示的执行速度考虑,我们使用了 cifar-10 数据集,而不是 ImageNet-1K 数据集。
import os
import copy
import numpy as np
import torch
import torch.nn as nn
import torchvision.transforms as transforms
from torch import Tensor
from torch.quantization import DeQuantStub
from torchvision.datasets import CIFAR10
from torchvision.models.mobilenetv2 import MobileNetV2
from torch.utils import data
from typing import Optional, Callable, List, Tuple

from horizon_plugin_pytorch.functional import rgb2centered_yuv

import torch.quantization
from horizon_plugin_pytorch.march import set_march
from horizon_plugin_pytorch.quantization import (
    QuantStub,
    prepare,
    set_fake_quantize,
    FakeQuantState,
)
from horizon_plugin_pytorch.quantization.qconfig_template import (
    default_calibration_qconfig_setter,
    default_qat_qconfig_setter,
)
from hbdk4 import compiler as hb4

import logging
logging.basicConfig(level=logging.INFO, format="%(levelname)s: %(message)s")
class AverageMeter(object):
    """Computes and stores the average and current value"""

    def __init__(self, name: str, fmt=":f"):
        self.name = name
        self.fmt = fmt
        self.reset()

    def reset(self):
        self.val = 0
        self.avg = 0
        self.sum = 0
        self.count = 0

    def update(self, val, n=1):
        self.val = val
        self.sum += val * n
        self.count += n
        self.avg = self.sum / self.count

    def __str__(self):
        fmtstr = "{name} {val" + self.fmt + "} ({avg" + self.fmt + "})"
        return fmtstr.format(**self.__dict__)


def accuracy(output: Tensor, target: Tensor, topk=(1,)) -> List[Tensor]:
    """Computes the accuracy over the k top predictions for the specified
    values of k
    """
    with torch.no_grad():
        maxk = max(topk)
        batch_size = target.size(0)

        _, pred = output.topk(maxk, 1, True, True)
        pred = pred.t()
        correct = pred.eq(target.view(1, -1).expand_as(pred))

        res = []
        for k in topk:
            correct_k = correct[:k].float().sum()
            res.append(correct_k.mul_(100.0 / batch_size))
        return res


def evaluate(
    model: nn.Module, data_loader: data.DataLoader, device: torch.device
) -> Tuple[AverageMeter, AverageMeter]:
    top1 = AverageMeter("Acc@1", ":6.2f")
    top5 = AverageMeter("Acc@5", ":6.2f")

    with torch.no_grad():
        for image, target in data_loader:
            image, target = image.to(device), target.to(device)
            output = model(image)
            acc1, acc5 = accuracy(output, target, topk=(1, 5))
            top1.update(acc1, image.size(0))
            top5.update(acc5, image.size(0))
            print(".", end="", flush=True)
        print()

    return top1, top5


def train_one_epoch(
    model: nn.Module,
    criterion: Callable,
    optimizer: torch.optim.Optimizer,
    scheduler: Optional[torch.optim.lr_scheduler._LRScheduler],
    data_loader: data.DataLoader,
    device: torch.device,
) -> None:
    top1 = AverageMeter("Acc@1", ":6.3f")
    top5 = AverageMeter("Acc@5", ":6.3f")
    avgloss = AverageMeter("Loss", ":1.5f")

    model.to(device)

    for image, target in data_loader:
        image, target = image.to(device), target.to(device)
        output = model(image)
        loss = criterion(output, target)
        optimizer.zero_grad()
        loss.backward()
        optimizer.step()
        if scheduler is not None:
            scheduler.step()
        acc1, acc5 = accuracy(output, target, topk=(1, 5))
        top1.update(acc1, image.size(0))
        top5.update(acc5, image.size(0))
        avgloss.update(loss, image.size(0))
        print(".", end="", flush=True)
    print()

    print(
        "Full cifar-10 train set: Loss {:.3f} Acc@1"
        " {:.3f} Acc@5 {:.3f}".format(avgloss.avg, top1.avg, top5.avg)
    )
#构建浮点模型
首先,在获取浮点模型后,我们需要对浮点模型进行必要的改造,以使其能够支持量化相关操作。模型改造必要的操作包括:
- 在模型输入前插入
QuantStub节点。 - 在模型输出后插入
DequantStub节点。
务必确保在非部署逻辑与部署逻辑的边界处插入了 QuantStub 和 DequantStub 节点。比如:计算辅助 loss 的 head 并不需要部署,应当在这个 head 的输入处插入 DequantStub 以保证这个 head 是不被量化的。
改造模型时需要注意:
- 插入的
QuantStub和DequantStub节点必须注册为模型的子模块,否则将无法正确处理它们的量化状态。 - 多个输入仅在 scale 相同时可以共享
QuantStub,否则请为每个输入定义单独的QuantStub。 - 若需要将上板时输入的数据来源指定为
"pyramid",请手动设置对应QuantStub的scale参数为1/128。 - 您也可以使用
torch.quantization.QuantStub,但是仅有horizon_plugin_pytorch.quantization.QuantStub支持通过参数手动固定 scale。
在此提供一个简易的多输入多输出示例,注意每个 QuantStub 负责一个输入 Tensor 的量化。
class Net(torch.nn.Module):
    def __init__(self):
        self.quantx = QuantStub()
        self.quanty = QuantStub()
        self.dequant = DequantStub()
        ...

    def forward(self, x, y):
        x = self.quantx(x)
        y = self.quanty(y)
        ...
        ret_0 = self.dequant(ret_0)
        ret_1 = self.dequant(ret_1)
        return ret_0, ret_1
改造后的模型可以无缝加载改造前模型的参数,因此若已有训练好的浮点模型,直接加载即可,否则需要正常进行浮点训练。
由于模型上板时的输入图像数据一般为 centered_yuv444 格式,因此模型训练时需要把图像转换成 centered_yuv444 格式(注意下面代码中对 rgb2centered_yuv 的使用)。
如果无法转换成 centered_yuv444 格式进行模型训练,请在模型部署时在输入上插入适当的颜色空间转换节点。(注意,该方法可能导致模型精度降低)
本章节示例中浮点和 QAT 训练的 epoch 较少,仅为说明训练工具使用流程,精度不代表模型最好水平。
######################################################################
# 可根据需要修改以下参数
# 1. 模型 ckpt 和编译产出物的保存路径
model_path = "model/mobilenetv2"
# 2. 数据集下载和保存的路径
data_path = "data"
# 3. 训练时使用的 batch_size
train_batch_size = 256
# 4. 预测时使用的 batch_size
eval_batch_size = 256
# 5. 训练的 epoch 数
epoch_num = 10
# 6. 模型保存和执行计算使用的 device
device = (
    torch.device("cuda") if torch.cuda.is_available() else torch.device("cpu")
)
######################################################################


# 准备数据集,请注意 collate_fn 中对 rgb2centered_yuv 的使用
def prepare_data_loaders(
    data_path: str, train_batch_size: int, eval_batch_size: int
) -> Tuple[data.DataLoader, data.DataLoader]:
    normalize = transforms.Normalize(mean=0.0, std=128.0)

    def collate_fn(batch):
        batched_img = torch.stack(
            [
                torch.from_numpy(np.array(example[0], np.uint8, copy=True))
                for example in batch
            ]
        ).permute(0, 3, 1, 2)
        batched_target = torch.tensor([example[1] for example in batch])

        batched_img = rgb2centered_yuv(batched_img)
        batched_img = normalize(batched_img.float())

        return batched_img, batched_target

    train_dataset = CIFAR10(
        data_path,
        True,
        transforms.Compose(
            [
                transforms.RandomHorizontalFlip(),
                transforms.RandAugment(),
            ]
        ),
        download=True,
    )

    eval_dataset = CIFAR10(
        data_path,
        False,
        download=True,
    )

    train_data_loader = data.DataLoader(
        train_dataset,
        batch_size=train_batch_size,
        sampler=data.RandomSampler(train_dataset),
        num_workers=8,
        collate_fn=collate_fn,
        pin_memory=True,
    )

    eval_data_loader = data.DataLoader(
        eval_dataset,
        batch_size=eval_batch_size,
        sampler=data.SequentialSampler(eval_dataset),
        num_workers=8,
        collate_fn=collate_fn,
        pin_memory=True,
    )

    return train_data_loader, eval_data_loader


# 对浮点模型做必要的改造
class QATReadyMobileNetV2(MobileNetV2):
    def __init__(
        self,
        num_classes: int = 10,
        width_mult: float = 1.0,
        inverted_residual_setting: Optional[List[List[int]]] = None,
        round_nearest: int = 8,
    ):
        super().__init__(
            num_classes, width_mult, inverted_residual_setting, round_nearest
        )
        self.quant = QuantStub()
        self.dequant = DeQuantStub()

    def forward(self, x: Tensor) -> Tensor:
        x = self.quant(x)
        x = super().forward(x)
        x = self.dequant(x)

        return x


if not os.path.exists(model_path):
    os.makedirs(model_path, exist_ok=True)

# 浮点模型初始化
float_model = QATReadyMobileNetV2()

# 准备数据集
train_data_loader, eval_data_loader = prepare_data_loaders(
    data_path, train_batch_size, eval_batch_size
)

# 由于模型的最后一层和预训练模型不一致,需要进行浮点 finetune
optimizer = torch.optim.Adam(
    float_model.parameters(), lr=0.001, weight_decay=1e-3
)
best_acc = 0

for nepoch in range(epoch_num):
    float_model.train()
    train_one_epoch(
        float_model,
        nn.CrossEntropyLoss(),
        optimizer,
        None,
        train_data_loader,
        device,
    )

    # 浮点精度测试
    float_model.eval()
    top1, top5 = evaluate(float_model, eval_data_loader, device)

    print(
        "Float Epoch {}: evaluation Acc@1 {:.3f} Acc@5 {:.3f}".format(
            nepoch, top1.avg, top5.avg
        )
    )

    if top1.avg > best_acc:
        best_acc = top1.avg
        # 保存最佳浮点模型参数
        torch.save(
            float_model.state_dict(),
            os.path.join(model_path, "float-checkpoint.ckpt"),
        )
Files already downloaded and verified
Files already downloaded and verified
....................................................................................................................................................................................................
Full cifar-10 train set: Loss 2.156 Acc@1 19.356 Acc@5 68.370
........................................
Float Epoch 0: evaluation Acc@1 30.970 Acc@5 84.260
...
....................................................................................................................................................................................................
Full cifar-10 train set: Loss 1.184 Acc@1 58.172 Acc@5 94.614
........................................
Float Epoch 9: evaluation Acc@1 63.040 Acc@5 95.940
#Calibration
模型改造完成并完成浮点训练后,便可进行 Calibration。此过程通过在模型中插入 Observer 的方式,在 forward 过程中统计各处的数据分布情况,从而计算出合理的量化参数:
- 对于部分模型,仅通过 Calibration 便可使精度达到要求,不必进行比较耗时的量化感知训练。
- 即使模型经过量化校准后无法满足精度要求,此过程也可降低后续量化感知训练的难度,缩短训练时间,提升最终的训练精度。
######################################################################
# 可根据需要修改以下参数
# 1. Calibration 时使用的 batch_size
calib_batch_size = 256
# 2. Validation 时使用的 batch_size
eval_batch_size = 256
# 3. Calibration 使用的数据量,配置为 inf 以使用全部数据
num_examples = float("inf")
# 4. 目标硬件平台的代号
march = "nash-e"
# 5. 模型 trace 和 export 使用的输入
example_input = torch.rand(1, 3, 32, 32, device=device)
######################################################################

# 在进行模型转化前,必须设置好模型将要执行的硬件平台
set_march(march)

# 将模型转化为 Calibration 状态,以统计各处数据的数值分布特征
calib_model = prepare(
    float_model, example_input, default_calibration_qconfig_setter
)

# 准备数据集
calib_data_loader, eval_data_loader = prepare_data_loaders(
    data_path, calib_batch_size, eval_batch_size
)

# 执行 Calibration 过程(不需要 backward)
# 注意此处对模型状态的控制,模型需要处于 eval 状态以使 Bn 的行为符合要求
calib_model.eval()
set_fake_quantize(calib_model, FakeQuantState.CALIBRATION)
with torch.no_grad():
    cnt = 0
    for image, target in calib_data_loader:
        image, target = image.to(device), target.to(device)
        calib_model(image)
        print(".", end="", flush=True)
        cnt += image.size(0)
        if cnt >= num_examples:
            break
    print()

# 测试伪量化精度
# 注意此处对模型状态的控制
calib_model.eval()
set_fake_quantize(calib_model, FakeQuantState.VALIDATION)

top1, top5 = evaluate(
    calib_model,
    eval_data_loader,
    device,
)
print(
    "Calibration: evaluation Acc@1 {:.3f} Acc@5 {:.3f}".format(
        top1.avg, top5.avg
    )
)

# 保存 Calibration 模型参数
torch.save(
    calib_model.state_dict(),
    os.path.join(model_path, "calib-checkpoint.ckpt"),
)
INFO: The qconfig of classifier.1 will be set to default_qat_8bit_weight_32bit_out_fake_quant_qconfig
INFO: Template qconfig has been set!
INFO: Begin check qat model...
INFO: All fusable modules are fused in model!
INFO: All modules in the model run exactly once.
WARNING: Please check these modules qconfig if expected:
+---------------+---------------------------------------------------------+-----------------------------------------+
| module name   | module type                                             | msg                                     |
|---------------+---------------------------------------------------------+-----------------------------------------|
| quant         | <class 'horizon_plugin_pytorch.nn.qat.stubs.QuantStub'> | Fixed scale 0.0078125                   |
| classifier.1  | <class 'horizon_plugin_pytorch.nn.qat.linear.Linear'>   | activation is None. Maybe output layer? |
+---------------+---------------------------------------------------------+-----------------------------------------+
INFO: Check full result in ./model_check_result.txt
INFO: End check


Files already downloaded and verified
Files already downloaded and verified
....................................................................................................................................................................................................
........................................
Calibration: evaluation Acc@1 62.740 Acc@5 95.960
模型经过 Calibration 后的量化精度若已满足要求,便可直接进行模型部署的步骤,否则需要进行量化感知训练进一步提升精度。
#量化感知训练
量化感知训练通过在模型中插入伪量化节点的方式,在训练过程中使模型感知到量化带来的影响,在这种情况下对模型参数进行微调,以提升量化后的精度。
多机多卡的适配
calibration 和 量化感知训练的过程均支持多机多卡,任务启动方式和浮点模型完全相同,每个进程中在将模型使用 torch.nn.parallel.DistributedDataParallel 封装之前先进行 prepare 即可。
######################################################################
# 可根据需要修改以下参数
# 1. 训练时使用的 batch_size
train_batch_size = 256
# 2. Validation 时使用的 batch_size
eval_batch_size = 256
# 3. 训练的 epoch 数
epoch_num = 3
######################################################################

# 准备数据集
train_data_loader, eval_data_loader = prepare_data_loaders(
    data_path, train_batch_size, eval_batch_size
)

# 将模型转为 QAT 状态
qat_model = prepare(float_model, example_input, default_qat_qconfig_setter)

# 加载 Calibration 模型中的量化参数
qat_model.load_state_dict(calib_model.state_dict())

# 进行量化感知训练
# 作为一个 filetune 过程,量化感知训练一般需要设定较小的学习率
optimizer = torch.optim.Adam(
    qat_model.parameters(), lr=1e-3, weight_decay=1e-4
)

best_acc = 0

for nepoch in range(epoch_num):
    # 注意此处对 QAT 模型 training 状态的控制方法
    qat_model.train()
    set_fake_quantize(qat_model, FakeQuantState.QAT)

    train_one_epoch(
        qat_model,
        nn.CrossEntropyLoss(),
        optimizer,
        None,
        train_data_loader,
        device,
    )

    # 注意此处对 QAT 模型 eval 状态的控制方法
    qat_model.eval()
    set_fake_quantize(qat_model, FakeQuantState.VALIDATION)

    top1, top5 = evaluate(
        qat_model,
        eval_data_loader,
        device,
    )
    print(
        "QAT Epoch {}: evaluation Acc@1 {:.3f} Acc@5 {:.3f}".format(
            nepoch, top1.avg, top5.avg
        )
    )

    if top1.avg > best_acc:
        best_acc = top1.avg

        torch.save(
            qat_model.state_dict(),
            os.path.join(model_path, "qat-checkpoint.ckpt"),
        )
Files already downloaded and verified
Files already downloaded and verified


INFO: The qconfig of classifier.1 will be set to default_qat_8bit_weight_32bit_out_fake_quant_qconfig
INFO: Template qconfig has been set!
INFO: Begin check qat model...
INFO: All fusable modules are fused in model!
INFO: All modules in the model run exactly once.
WARNING: Please check these modules qconfig if expected:
+---------------+---------------------------------------------------------+-----------------------------------------+
| module name   | module type                                             | msg                                     |
|---------------+---------------------------------------------------------+-----------------------------------------|
| quant         | <class 'horizon_plugin_pytorch.nn.qat.stubs.QuantStub'> | Fixed scale 0.0078125                   |
| classifier.1  | <class 'horizon_plugin_pytorch.nn.qat.linear.Linear'>   | activation is None. Maybe output layer? |
+---------------+---------------------------------------------------------+-----------------------------------------+
INFO: Check full result in ./model_check_result.txt
INFO: End check


....................................................................................................................................................................................................
Full cifar-10 train set: Loss 1.267 Acc@1 55.638 Acc@5 93.620
........................................
QAT Epoch 0: evaluation Acc@1 63.500 Acc@5 96.540
...
....................................................................................................................................................................................................
Full cifar-10 train set: Loss 1.111 Acc@1 60.960 Acc@5 95.274
........................................
QAT Epoch 2: evaluation Acc@1 67.160 Acc@5 97.200
#模型部署
在经过上文所述的一系列过程,伪量化精度达标后,便可执行模型部署的相关流程,主要包括导出 HBIR 模型(export)以及转定点模型(convert)操作。
#导出 HBIR 模型
模型部署首先需要将伪量化模型导出为 HBIR 模型。
- 模型导出时使用的 example_input 的 batch_size 决定了模型仿真和模型上板时的 batch_size,若需要在仿真和上板使用不同的 batch_size,请使用不同的数据分别导出 HBIR 模型。
- 您也可以选择跳过 Calibration 和量化感知训练中的实际校准和训练过程,先直接进行模型部署的流程,以保证模型中不存在无法导出或编译的操作。
精度说明
导出的 hbir 模型理论上计算逻辑和 torch 模型一致,但存在以下区别,会造成数值无法对齐:
-
torch 模型中的大部分非线性 elementwise 算子,在 hbir 中转为查表的实现方式。
-
存在累加计算的算子如 reduce_sum, gemm 等,会由于累加的顺序不同导致数值波动。
######################################################################
# 可根据需要修改以下参数
# 1. 使用哪个模型作为流程的输入,可以选择 calib_model 或 qat_model
base_model = qat_model
######################################################################

from horizon_plugin_pytorch.quantization.hbdk4 import export

qat_model.eval()
set_fake_quantize(qat_model, FakeQuantState.VALIDATION)
hbir_qat_model = export(base_model, (example_input,))
INFO: Model ret: Tensor(shape=(1, 10), dtype=torch.float32, device=cuda:0)
#转定点模型
导出为 HBIR 模型后,便可将模型转为定点模型。一般我们认为精度方面,定点模型的结果和编译后模型的结果是完全一致的。
- HBIR 模型的输入仅支持单个
Tensor或Tuple[Tensor], 输出仅支持Tuple[Tensor]。 - 定点模型和伪量化模型之间无法做到完全数值一致,所以请以定点模型的精度为准。若定点模型精度不达标,需要继续进行量化感知训练直到精度满足您的要求。
精度说明
convert 前后,模型由浮点伪量化计算变为定点计算,会导致数值波动。
# 将模型转为定点状态,注意此处的 march 需要区分 nash-e/m/p
hbir_quantized_model = hb4.convert(
    hbir_qat_model,
    "nash-e",
)

# hbir 精度测试使用的 dataloader,注意此处的 batch_size 必须和 export hbir 时
# 使用的 example_input 相同
_, eval_hbir_data_loader = prepare_data_loaders(
    data_path, train_batch_size, 1
)

def evaluate_hbir(
    model: hb4.Module, data_loader: data.DataLoader
) -> Tuple[AverageMeter, AverageMeter]:
    top1 = AverageMeter("Acc@1", ":6.2f")
    top5 = AverageMeter("Acc@5", ":6.2f")

    for image, target in data_loader:
        image, target = image.cpu(), target.cpu()
        # 默认输入输出名字为 _input_{n}, _output_{n} 的形式,可以在 export 时
        # 通过参数自定义
        output = model["forward"].feed({"_input_0": image})["_output_0"]
        acc1, acc5 = accuracy(output, target, topk=(1, 5))
        top1.update(acc1, image.size(0))
        top5.update(acc5, image.size(0))

    return top1, top5


# 测试定点模型精度
top1, top5 = evaluate_hbir(
    hbir_quantized_model,
    eval_hbir_data_loader,
)
print(
    "Quantized model: evaluation Acc@1 {:.3f} Acc@5 {:.3f}".format(
        top1.avg, top5.avg
    )
)
Files already downloaded and verified
Files already downloaded and verified
Quantized model: evaluation Acc@1 65.620 Acc@5 93.000
#(可选)模型修改
在模型编译前,我们也支持对模型进行板端部署相关的修改,常见操作及其API接口如下:
-
在模型export之后,convert之前:
-
batch输入拆分:使用
insert_split()接口。 -
模型中插入图像前处理节点:
a. 需要先将排布调整成NHWC排布以进行后续操作:此过程通过调用
insert_transpose()接口进行。b. 图像归一化:此过程通过调用
insert_image_preprocess()接口进行。c. 色彩转换(板端部署通常为nv12输入):此过程通过调用
insert_image_convert()接口进行。d. 配置为resizer输入,支持基于roi进行抠图和缩放:此过程通过调用
insert_roi_resize()接口进行。 -
调整输入输出数据排布:此过程通过调用
insert_transpose()接口进行。
-
-
在模型convert之后,compile之前,进行算子删除(Quantize/Dequantize/Cast等算子):此过程通过调用
remove_io_op()接口进行。
以上调用API接口的详细说明您可参考 HBDK Tool API Reference 章节的介绍。
#模型编译
测试定点模型精度并确认符合您的要求后,便可以进行模型编译、性能测试和可视化。
模型性能测试使用的模型,请确保已至少做过一次校准(step 数不限),以保证模型中的统计量符合实际情况,否则会造成性能测试结果不准确。
######################################################################
# 可根据需要修改以下参数
# 1. 编译时启用的优化等级,等级越高编译出的模型上板执行速度越快,但编译过程会慢
compile_opt = 1
######################################################################

# 模型编译
hb4.compile(
    hbir_quantized_model,
    os.path.join(model_path, "model.hbm"),
    "nash-e",
    opt=compile_opt,
)

# 模型性能测试
hb4.hbm_perf(
    os.path.join(model_path, "model.hbm"),
    output_dir=model_path,
)
[10h:58m:15s:654039us INFO hbrt4_loader::parsing] pid:212735 tid:212735 hbrt4_loader/src/parsing.rs:42: Load hbm header from file; filename="model/mobilenetv2/model.hbm"
[10h:58m:15s:655241us INFO hbrt4_log::logger] pid:212735 tid:212735 hbrt4_log/src/logger.rs:388: Logger of HBRT4 initialized, version = 4.1.2
[10h:58m:15s:655253us INFO hbrt4_loader::parsing] pid:212735 tid:212735 hbrt4_loader/src/parsing.rs:73: Load hbm from file; filename="model/mobilenetv2/model.hbm"


  FPS=11518.08, latency = 86.799999999999997 us, DDR = 2597376 bytes   (see model/mobilenetv2/forward.html)
HBDK hbm perf SUCCESS
# 模型可视化
hb4.visualize(hbir_quantized_model, "mobilenetv2_cifar10.onnx")
[92mTemporary onnx file saved to mobilenetv2_cifar10.onnx[0m